SpookyGhost is a procedural animation tool for sprites made with the nCine.
You can animate many different properties like the size, rotation, position, and color of your sprites, as well as deform their shape.
You can also use the Lua progamming language to write scripts for custom-made animations.
When you are satisfied with the results you can export the animation as single frames or as one big sprite sheet.
If you find a bug in the program please open an issue on GitHub or report it on the Itch.io community.
Interface
ImGui interaction
SpookyGhost interface is made with ImGui. You can use most of ImGui’s user interaction capabilities while using the program.
You can drag windows around and anchor them into any corner, change the split space between them or tab them one next to another.
If you press Ctrl while clicking on a slider or a drag box you can input the value with the keyboard. Another interesting functionality is the ability to modify the speed of change of drag boxes by pressing Shift or Alt. With the first key, the change will be faster while with the second one it will be slower. Try it now while changing a texture rectangle in the Sprite window.
You can use the usual Ctrl+X, Ctrl+C, and Ctrl+V to cut, copy, and paste text in a text input widget.
You can drag and drop colors around, for example, the background color of the Canvas window onto the sprite color in the Sprite window.
Menus
File menu
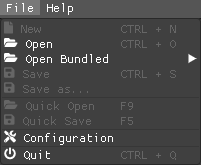
Selecting or pressing Ctrl+N will remove all animations, sprites, and textures.
Selecting or pressing Ctrl+O will open the File dialog window to specify the project file to load. The file dialog will only show files with the lua extension.
Selecting will open a list of projects to load. They are distributed alongside the program as examples.
Selecting or pressing Ctrl+S will save the currently opened project. The menu item is available only if you have opened a project previously or if you have already saved it with a name.
Selecting will open the File dialog window to specify the filename to use for saving.
If the Allow Overwrite checkbox is not enabled the program will not save if a file with the same name exists already.
Selecting or pressing F9 will open the last file saved with the Quick Save function. Keep in mind that the operation will be performed without asking the user to first save the current project.
Selecting or pressing F5 will save a project file using a combination of the date and time as the name. It can be a way to save multiple versions of your project while working on it.
Selecting will open the Configuration window.
Selecting or pressing Ctrl+Q will open a modal window asking if you want to quit the program.
Help menu
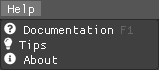
Selecting or pressing F1 will open this documentation file.
Selecting will open the Tips window.
Selecting will open the about window with information about the program version.
File dialog
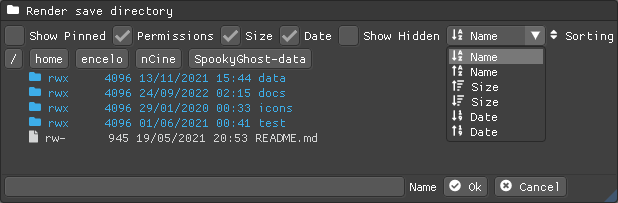
When you have to browse your filesystem to load and save files or choose directories, the program will present you with a file dialog window.
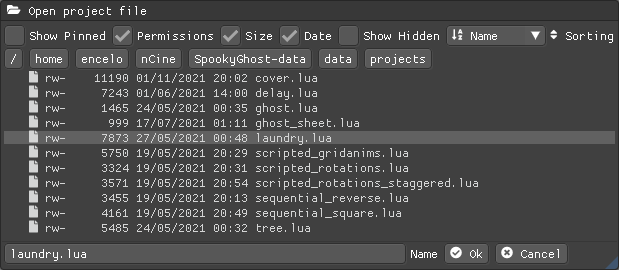
The file dialog will show you all the entries inside a directory together with their types (file or directory), access permissions, sizes, and last modification dates. It will also color executables with a shade of green and filter files by extension if needed, for example when loading a project file or a texture.
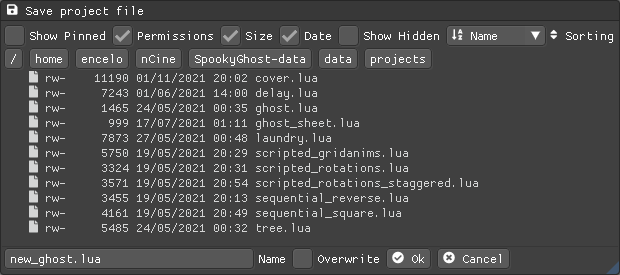
When saving a project file the file dialog will be slightly different. It will have an Overwrite checkbox to bypass the check for an existing file and it will allow you to write in the text input widget and choose a name for the new file.
When deciding the destination directory for rendered frames the file dialog will allow directories to be selected.
All kinds of file dialogs have a set of checkboxes to show or hide pinned directories, file permissions, sizes, and dates plus a checkbox that when enabled will show hidden files or directories. As you can see in the last screenshot there is also a drop-down menu to select the entries sorting based on names, sizes, or dates.
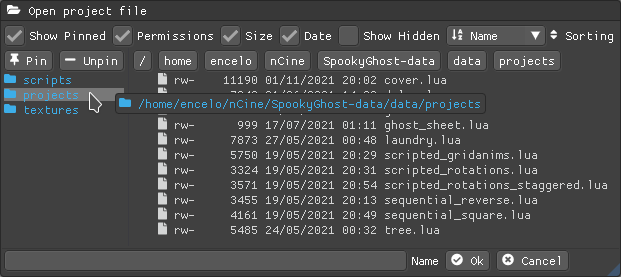
When the checkbox for the pinned directories is enabled you will see a panel on the left that shows a list of directories that are currently pinned for a quicker access: just click on one of them to navigate there. You can reorder the list by drag and drop.
To add a new directory to the list of pinned directories just browse to the desired directory and click the Pin button. To remove an element from the list either browse to it and click Unpin, or right-click it and select Unpin from the context menu. The list of pinned directories is automatically saved to the configuration file when you quit the program.
|
You can pin directories also by drag and dropping files or directories to the list. You can drag and drop a file or a directory to the browser to navigate to that file or directory. |
Tips window
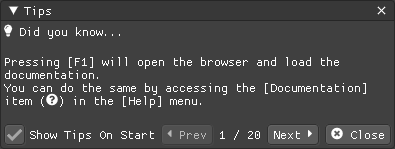
The Tips window will show you a random tip about the program every time you start it.
You can read the previous or the next tip with the Prev and Next buttons. You can also navigate them with the left or right arrow key while the cursor is over this window.
There is also a checkbox to enable or disable the default behavior of automatically showing this window on start. The same checkbox is also present in the Configuration window.
Configuration window
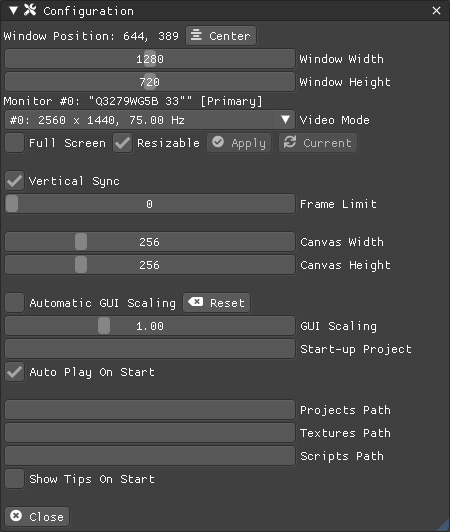
The Configuration window contains some customizable properties that will be used every time the program starts.
The top section allows you to center the window on screen or change its size, or to go full screen with the desired video mode. You can make the window Resizable or not as well as Apply your changes immediately or go back to Current window settings.
Next, you can enable or disable Vertical Sync. If you disable it you can specify a Frame Limit to control the number of frames rendered per second or select 0 to switch it off.
To apply the changes in this section you need to save the configuration and restart the program.
You can choose the initial canvas size that will be used when the program starts for the first time.
You can explicitly scale the interface to make it bigger or smaller, or let it automatically scale based on the scaling factor of your monitor.
After that, you can choose the name of a project file that will be loaded the first time you start the program and optionally play it right away.
The three text input widgets will let you choose a path for textures, sprites, and scripts that will be concatenated if you specify a relative path when loading.
With the last checkbox you can enable or disable the automatic showing of the Tips window when the program starts up.
Upon closing the window the configuration will be saved in the config.lua file in the same directory as the program executable.
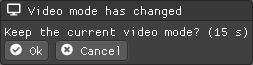
If you go full screen on a video mode that is not the current one, a confirmation popup will appear. Press the Cancel button, the Escape key, or wait 15 seconds to revert the change. |
Textures window
One of the tabs in the top left corner of the interface is the Textures window.
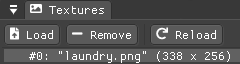
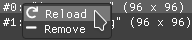
Before being able to create any sprite you need to load at least one texture from here. Clicking the Load button will open the File dialog window. The file dialog will only show files with the png extension.
|
You can load textures also by drag and dropping files anywhere onto the |
You can delete the selected texture by clicking the Remove button or pressing the Delete key while the cursor is over this window.
You can load a different file for your texture using the Reload button. Your sprites and your animations will update with the new image.
Some of those actions are also available in the context menu that appears when you right-click on a texture.
When you create a new sprite it will use the texture you selected in this window.
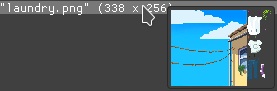
If you hover with the mouse on a texture a small preview will appear as a tooltip. |
Sprites window
Next to the Textures window tab, you will find the Sprites window.
You can use it to Add and Remove sprites or to move an existing sprite to a higher or lower drawing layer.
With the Add Group button you can create sprite groups, use them to organize your sprites or other groups.
Next to a sprite or a group there is a color square that will help you locate the corresponding animations in the Animations window. You can click on any of those squares to pick a different color. A sprite inside a group will use its parent group color but it will revert to the original one once it is taken out.
You can also delete the selected sprite or group by pressing the Delete key while the cursor is over this window.
With the Clone button, it is possible to create a copy of the selected sprite. The animations assigned to the original sprite will be cloned as well. If the selected sprite has children sprites they will be cloned too. If you select a group and clone it then every contained sprites will be clones, including their animations and children sprites.
Some of those actions are also available in the context menu that appears when you right-click on a sprite.
At the beginning of each entry, there is a checkbox you can use to make the sprite visible or not.
The list order is reversed so that the top sprite is also the one that will be rendered on top of the others.
You can reorder the list with the Move Up and Move Down buttons or by drag and drop. You can also move them with the up or down arrow key while the cursor is over this window.
|
You can quickly edit a sprite name by clicking on a sprite while pressing CTRL. |
|
If you hover with the mouse on a sprite a small preview will appear as a tooltip. |
| The texture icon at the end of an entry indicates that the sprite is using the currently selected texture. |
Scripts window
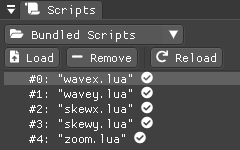
Next to the Sprites window tab, you will find the Scripts window.
At the top, there is a combo box with a list of scripts that are distributed with the program: use it to easily load the default scripts.
Below you will find some buttons that you can use to Load and Remove Lua scripts as well as Reload them when they have changed on disk.
|
You can load scripts also by drag and dropping files anywhere onto the |
You can also delete the selected script by pressing the Delete key while the cursor is over this window.
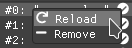
Some of those actions are also available in the context menu that appears when you right-click on a script.
At the end of each entry, you will find either a checkmark or a cross icon. The first one tells you that there are no syntax errors and the script can run while the second indicates the opposite.
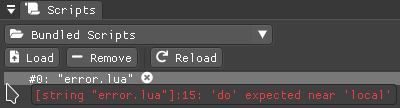
In case of errors that prevent a script from running, you can hover on the entry to show a tooltip with the error message.
| You can reload a script also by pressing CTRL+R. |
Animations window
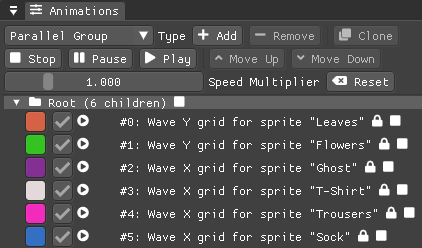
In the lower part of the left side of the interface, you will find the Animations window.
You can use it to Add and Remove animations and to change their state with the Stop, Pause, and Play buttons.
Below those buttons there is slider to control the global speed multiplier, it can be used to change the speed of all animations at once.
You can delete the selected animation also by pressing the Delete key while the cursor is over this window.
With the Clone button, it is possible to create a copy of the selected animation or animation group.
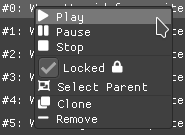
Some of those actions are also available in the context menu that appears when you right-click on an animation.
At the beginning of each entry, there is a color square that matches the color of the assigned sprite or its parent group.
Next to it there is a checkbox you can use to make the animation enabled or not. A disabled animation will not be played by the parent group that contains it.
You can find an icon about the current animation state at the end of an animation entry.

You can quickly edit an animation name by clicking on a animation while pressing CTRL. |
| Pressing Space when hovering on the Canvas window will toggle the animation state between playing and paused. |
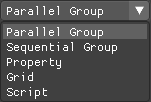
Before pressing the Add button, choose one of the four animation types.
Animation groups
The Parallel Group and Sequential Group help to organize together multiple animations. They will be played together or one after another depending on the group type. An animation group can also be composed of sub-groups.
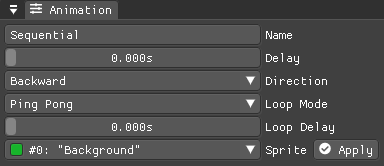
Their window has the same Direction and Loop Mode options as the non-group animation types.
Like all animation types, they have a Delay value that allows setting a delay in seconds between the time the animation goes into the playing state and the animation start.
They also have a Loop Delay value that allows setting a delay in seconds between each loop reset.
At the bottom there is a list of sprites with an Apply button that overrides the sprite used by every contained animation. It comes in handy when you clone a group and want to apply the same animations to a different sprite.
| Animations inside a Sequential Group will not be able to loop. |
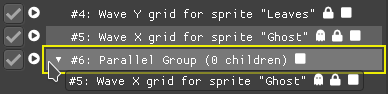
You can reorder the child order with the Move Up and Move Down buttons or change the parent and children relationships by drag and drop. You can also move them with the up or down arrow key while the cursor is over this window. |
| The sprite icon at the end of an entry indicates that the animation is assigned to the currently selected sprite. When you select a different animation its assigned sprite will be automatically selected. |
Sprite window
On the top part of the right side of the interface, you will find the Sprite window.
You can change all the properties of the selected sprite from here.
You will be able to give it a name, change its texture, set a parent sprite, change its position, rotation, scale, and anchor point. You will also be able to select a texture rectangle, flip the texture, select a blending type separately for the RGB and alpha channels and change its color.
When you set a parent for a sprite its properties will depend upon its parent’s properties, the properties of its grandparent, and so on. The parent-child sprite relationship is a powerful way to achieve very complex chained transformations.
Selecting a texture rectangle is useful when your texture is a sprite sheet and you only want to use a specific area as your sprite.
| You can use the TexRect window to help you set up a texture rectangle using the mouse. |
Animation window
Next to the Sprite window tab, you will find the Animation window, where you can change all the properties of the selected animation.
For every type of animation, including a group one, you will be able to change its name at the top of the interface.
Property animation window
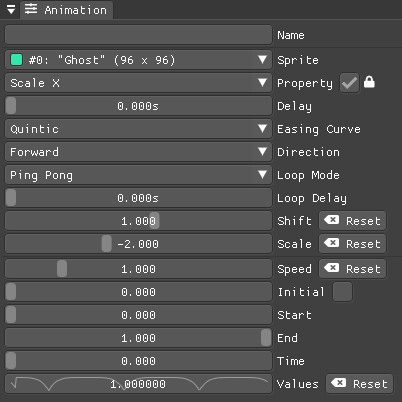
With the Sprite drop-down menu, you can choose the sprite whose property you want to change.
Just beneath you can choose which property to animate:
-
Position
-
Rotation
-
Scale
-
Anchor Point
-
Opacity
-
Color channels
Next to the property name, there is a checkbox with a lock icon. When it is enabled the curve value is applied to the property even if the animation is currently stopped or paused. This option is useful to show a preview of how the property animation is affecting the sprite given the current curve value.
Like all animation types, it has a Delay value that allows setting a delay in seconds between the time the animation goes into the playing state and the animation start.
You can change the easing curve of the time parameter between a list of curves like:
-
Linear
-
Quadratic
-
Cubic
-
Quartic
-
Quintic
-
Sine
-
Exponential
-
Circular
You can then select the Direction: Forward or Backward. And then the Loop Mode: Disabled, Rewind, or Ping Pong.
Like all loopable animations, there is also a Loop Delay value that allows setting a delay in seconds between each loop reset.
You are then presented with two sliders that let you Shift and Scale the value returned by the curve function.
The function will take the time parameter, a number between 0 and 1, and return another value between 0 and 1.
You can then shift this value and scale it according to your needs. For example, if you want your sprite to move horizontally from 100 to 150 you will need to set Position X as your property, then shift the value to 100 and scale it to 50.
Going below there is another block of options. They are related to time: the input parameter to the easing function.
You can change the Speed to make the animation slower or faster, and you can change the Start and End values to affect its range.
The Initial value is very similar to the Start and End values but, instead of defining a range, it allows to specify an initial value within the range. It is very useful, for example, when you want to reuse the same animation and the same range multiple times on different sprites but you want them to play staggered.
The last slider, Time, is updated in real-time according to the current time value. When the animation is not playing you can directly change it to see how it affects your sprite property.
You can also read the current value for the easing curve and have a look at a graphical plot of recent Values.
Grid animation window
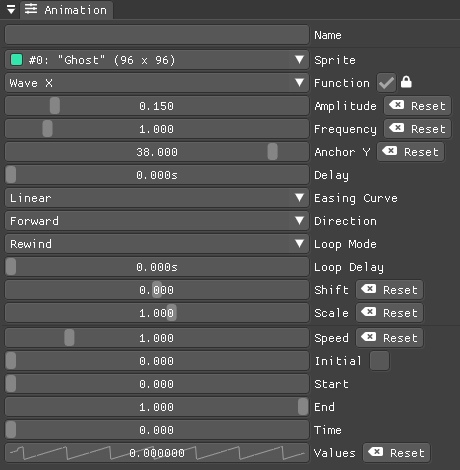
A grid animation deforms your sprite shape to achieve some special effects.
The interface is identical to the Property animation window one with some small but important differences.
Instead of being able to choose which sprite property to affect you will be able to choose a grid Function.
There are five different grid functions to choose from:
-
Wave X
-
Wave Y
-
Skew X
-
Skew Y
-
Zoom
Next to the grid function name, there is a checkbox with a lock icon. When it is enabled the curve value is applied to the function even if the animation is currently stopped or paused. This option is useful to show a preview of how the grid animation is affecting the sprite given the current curve value.
Functions can be combined by adding multiple grid animations that affect the same sprite. For example, you can add a Wave X and a Wave Y function to make the sprite wave in both directions.
|
Depending on which function you choose a different list of parameters will appear. They will allow you to tweak the results of the grid deformation.
Some grid functions have an anchor related parameter, it can be edited with the mouse in the Canvas window.
Script animation window
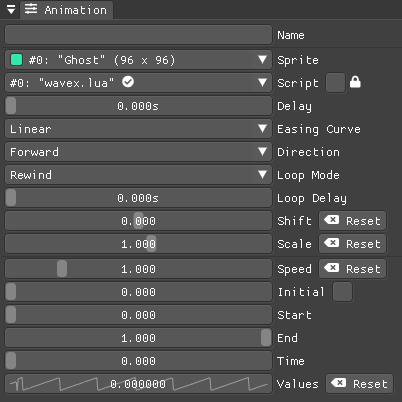
A script animation runs a particular Lua script to perform a custom animation.
The interface is very similar to a Property animation window or a Grid animation window.
You can choose the sprite to animate as well as the script you want to use among the ones currently loaded.
Similarly to the Scripts window, a checkmark or a cross icon will tell you if a script can run.
Next to the script name, there is a checkbox with a lock icon. When it is enabled the script will be invoked even if the animation is currently stopped or paused. This option is useful to show a preview of how the script animation is affecting the sprite given the current curve value.
Render window
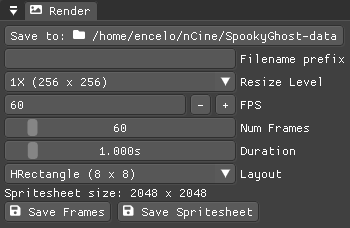
When you are happy with the results of your animation it is time to export it.
Clicking the button on top will open the File dialog window to choose a destination directory.
|
You can change the destination directory also by drag and dropping a file or a directory anywhere onto the |
You can then choose a prefix for the files that are going to be created. Just specify a filename without the extension.
You can then choose to resize the canvas before saving its contents and then choose how many frames to generate per second. The resize combo box will also show the size of a resized frame.
Based on the FPS value you will then be able to change the number of frames produced either by setting its number directly or by choosing a duration.
The Layout combo box will let you specify how the frames will be arranged inside a spritesheet. You can choose between a rectangle arrangement that prioritizes the horizontal or vertical dimension (HRectangle and VRectangle), a horizontal or vertical strip (HStrip and VStrip), or specify Custom values for the two dimensions.
When you are ready you can either press Save Frames and have all the frames saved as distinct PNG images or press Save Spritesheet and save all frames in a single big PNG image.

While the operation is in progress you can click the Cancel button or press the Esc key to cancel it.
When the saving operation is completed the window and the system taskbar will flash to notify its success.
You can read how big a single frame and the sprite sheet are going to be in the Frame size and Spritesheet size text widgets.
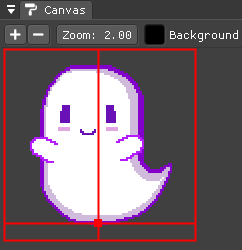
Canvas window
At the center of the interface lies the Canvas window. The canvas is your working area for animations.
If you press Alt you can drag the selected sprite around by clicking anywhere in the canvas.
At the top of this window, you will find some controls to change the zoom level, its size, and its background color.
| You can change the canvas zoom level by hovering on the Canvas window, pressing the Ctrl key, and scrolling the mouse wheel. |
When you change the background color don’t forget to change the alpha opacity or you might not see the color you selected in the canvas.
When the Borders checkbox is enabled a colored rectangle will show the current size of the canvas.
| Pressing the arrow keys while the cursor is on the Canvas window will move the selected sprite in one-pixel increments for precise positioning. |
You can also change the sprite anchor point by pressing Shift and the left mouse button and dragging the red point around the red rectangle.
If you instead press Ctrl and the left mouse button a blue point and a blue rectangle will appear to allow you to set the grid anchor point used by Grid animations.
You can also press Shift+Ctrl together and use the mouse to set both the sprite and the grid anchor points in one go.
TexRect window
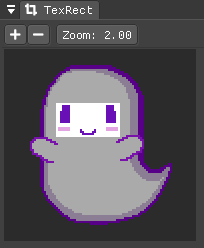
The TexRect window shows you which part of the texture will be used by the sprite for rendering.
You can use the mouse to select a rectangular region and fine-tune its size in the [Sprites section] of the interface.
If you press Alt and click inside the rectangle, you can drag it around by moving the mouse.
If you press Shift and click inside the rectangle, you can resize it by moving the mouse. If you are close to a corner you will be able to resize the rectangle by moving that corner. If you are close to a side, but not to a specific corner, you will be able to resize the rectangle by moving that side.
Status bar

At the bottom of the interface, you will find the status bar. It will show error and information messages as well as the mouse coordinates during some operations.
Bundled projects files
The program comes with some bundled project files to show its features and potential.
ghost.lua, laundry.lua, tree.lua
Those three files are the classic projects distributed since the first versions of the program. They show what is visually and artistically achievable by using very few and simple animations.
delay.lua
The project uses some very simple property animations that, together with different delay values, can achieve an interesting result.
ghost_sheet.lua
The project uses the texrect.lua script to modify the texture rectangle and animate using a sprite sheet.
scripted_gridanims.lua
The project uses the skewx.lua, skewy.lua, wavex.lua, wavey.lua, and zoom.lua scripts to show how a Lua script can replicate the same functions of a grid animation, albeit consuming a bit more CPU power.
scripted_rotations.lua
The project uses the circle.lua script to show some rotating ghost sprites.
scripted_rotations_staggered.lua
The project is very similar to scripted_rotations.lua and it also uses the circle.lua script. The difference here is the use of different initial values to create out-of-phase rotations.
sequential_square.lua
The project uses two sequential animation groups to move a sprite along a path shaped as a square while also using some grid animations to perform a zoom at the same time.
sequential_reverse.lua
The project has a long sequential animation group that can perfectly loop by automatically change the direction of the property animations it contains.
cover.lua
The project animates each letter of the SpookyGhost logo differently and it is used for the Itch.io GIF cover.
Lua animation API
Each Lua script needs to define an update(value) function. It will be called each frame of the animation with a different value parameter.
If you need to perform some calculation only once, when the animation is first started, consider using the init(value) function as an optimization.
get_canvas_width() / get_canvas_height()
Returns the canvas width or height in pixels.
local canvas_width = get_canvas_width()
local canvas_height = get_canvas_height()
print("canvas size: " .. canvas_width .. "x" .. canvas_height)
get_texture_width() / get_texture_height()
Returns the sprite texture width or height in pixels.
local texture_width = get_texture_width()
local texture_height = get_texture_height()
print("texture size: " .. texture_width .. "x" .. texture_height)
get_width() / get_height()
Returns the sprite width or height in pixels.
local width = get_width()
local height = get_height()
print("sprite size: " .. width .. "x" .. height)
get_position()
Returns the position of the sprite in pixels as a table with the x and the y fields.
local position = get_position()
print("position x: " .. position.x .. " y: " .. position.y)
get_x() / get_y()
Returns the x or y component of the position of the sprite in pixels.
local x = get_x()
local y = get_y()
print("position x: " .. x .. " y: " .. y)
get_rotation()
Returns the rotation of the sprite in degrees.
local rotation = get_rotation()
print("rotation: " .. rotation)
get_scale()
Returns the scale of the sprite as a table with the x and the y fields.
local scale = get_scale()
print("scale x: " .. scale.x .. " y: " .. scale.y)
get_scale_x() / get_scale_y()
Returns the x or y component of the scale of the sprite.
local scale_x = get_scale_x()
local scale_y = get_scale_y()
print("scale x: " .. scale_x .. " y: " .. scale_y)
get_anchor()
Returns the anchor point of the sprite in pixels as a table with the x and the y fields.
local anchor = get_anchor()
print("anchor x: " .. anchor.x .. " y: " .. anchor.y)
get_anchor_x() / get_anchor_y()
Returns the x or y component of the anchor point of the sprite.
local anchor_x = get_anchor_x()
local anchor_y = get_anchor_y()
print("anchor x: " .. anchor_x .. " y: " .. anchor_y)
get_color()
Returns the color of the sprite as a table with the r, g, b and a fields for the normalized values of the red, green, blue and alpha channels.
local color = get_color()
print(string.format("color: #%X%X%X%X", math.floor(color.r * 255 + 0.5), math.floor(color.g * 255 + 0.5), math.floor(color.b * 255 + 0.5), math.floor(color.a * 255 + 0.5)))
get_texrect()
Returns the texture rectangle of the sprite as a table with the x, y, w and h fields for the position, the width, and the height of the rectangle.
local rect = get_texrect()
print("texrect x: " .. rect.x .. " y: " .. rect.y .. " w: " .. rect.w .. " h: " .. rect.h)
get_flipped_x() / get_flipped_y()
Returns the value of the horizontal or vertical flipping flag of the sprite.
local is_hflipped = get_flipped_x()
local is_vflipped = get_flipped_y()
print("flipped h: " .. (is_hflipped and 'true' or 'false') .. " v: " .. (is_vflipped and 'true' or 'false'))
get_rgb_blending() / get_alpha_blending()
Returns the current blending preset value for the RGB or alpha channels of the sprite.
It can be one of the members of the blending_preset table: DISABLED, ALPHA, PREMULTIPLIED_ALPHA, ADDITIVE, or MULTIPLY.
-
DISABLED: source factor isGL_ONE, destination factor isGL_ZERO. -
ALPHA: source factor isGL_SRC_ALPHA, destination factor isGL_ONE_MINUS_SRC_ALPHA. -
PREMULTIPLIED_ALPHA: source factor isGL_ONE, destination factor isGL_ONE_MINUS_SRC_ALPHA. -
ADDITIVE: source factor isGL_SRC_ALPHA, destination factor isGL_ONE. -
MULTIPLY: source factor isGL_DST_COLOR, destination factor isGL_ZERO.
local blending = get_rgb_blending()

local blending_string = "UNKNOWN"
if blending == blending_preset.DISABLED then
	blending_string = "DISABLED"
elseif blending == blending_preset.ALPHA then
	blending_string = "ALPHA"
elseif blending == blending_preset.PREMULTIPLIED_ALPHA then
	blending_string = "PREMULTIPLIED_ALPHA"
elseif blending == blending_preset.ADDITIVE then
	blending_string = "ADDITIVE"
elseif blending == blending_preset.MULTIPLY then
	blending_string = "MULTIPLY"
end

print("blending: " .. blending_string)
get_num_vertices()
Returns the number of vertices of the sprite grid.
local num_vertices = get_num_vertices()
print("number of vertices: " .. num_vertices)
get_vertices()
Returns all the vertices of the sprite grid as an array of tables with the x, y, u, and v fields for the positions and the texture coordinates.
local vertices = get_vertices()
-- Print the position and texture coordinates of the first four vertices
for i = 1, 4 do
	print(string.format("vertex #%d x: %f y: %f u: %f v: %f", i, vertices[i].x, vertices[i].y, vertices[i].u, vertices[i].v))
end
get_vertices_xy()
Returns all the vertices of the sprite grid as an array of tables with the x and y fields for the positions.
local vertices_xy = get_vertices_xy()
-- Print the position of the first four vertices
for i = 1, 4 do
	print(string.format("vertex #%d x: %f y: %f", i, vertices_xy[i].x, vertices_xy[i].y))
end
get_vertices_uv()
Returns all the vertices of the sprite grid as an array of tables with the u and v fields for the texture coordinates.
local vertices_uv = get_vertices_uv()
-- Print the texture coordinates of the first four vertices
for i = 1, 4 do
	print(string.format("vertex #%d u: %f v: %f", i, vertices_uv[i].u, vertices_uv[i].v))
end
get_vertices_x() / get_vertices_y() / get_vertices_u() / get_vertices_v()
Returns all the vertices of the sprite grid as an array of x, y, u, or v components of the positions or texture coordinates.
local vertices_x = get_vertices_x()
local vertices_y = get_vertices_y()
local vertices_u = get_vertices_u()
local vertices_v = get_vertices_v()
-- Print the texture coordinates of the first four vertices
for i = 1, 4 do
	print(string.format("vertex #%d x: %f y: %f u: %f v: %f", i, vertices_x[i], vertices_y[i], vertices_u[i], vertices_v[i]))
end
set_position()
Sets the position of the sprite in pixels through a table with the x and the y fields.
new_position = { x = 0, y = 0 }
set_position(new_position)
set_x() / set_y()
Sets the x or y component of the position of the sprite in pixels.
set_x(0)
set_y(0)
set_rotation()
Sets the rotation of the sprite in degrees.
set_rotation(0)set_scale()
Sets the scale of the sprite through a table with the x and the y fields.
new_scale = { x = 1, y = 1 }
set_scale(new_scale)
set_scale_x() / set_scale_y()
Sets the x or y component of the scale of the sprite.
set_scale_x(1)
set_scale_y(1)
set_anchor()
Sets the anchor point of the sprite in pixels with one rgument: as a table with the x and the y fields.
new_anchor = { x = 0, y = 0 }
set_anchor(new_anchor)
set_anchor_x() / set_anchor_y()
Sets the x or y component of the anchor point of the sprite.
set_anchor_x(0)
set_anchor_y(0)
set_color()
Sets the color of the sprite through a table with the r, g, b and a fields for the normalized values of the red, green, blue and alpha channels.
new_color = { r = 1.0, g = 1.0, b = 1.0, a = 1.0}
set_color(new_color)
set_texrect()
Sets the texture rectangle of the sprite through a table with the x, y, w and h fields for the position, the width, and the height of the rectangle.
new_rect = { x = 0, y = 0, w = get_texture_width(), h = get_texture_height()}
set_texrect(new_rect)
set_flipped_x() / set_flipped_y()
Sets the value of the horizontal or vertical flipping flag of the sprite.
set_flipped_x(false)
set_flipped_y(false)
set_rgb_blending() / set_alpha_blending()
Sets the blending preset value for the RGB or alpha channels of the sprite.
It can be one of the members of the blending_preset table: DISABLED, ALPHA, PREMULTIPLIED_ALPHA, ADDITIVE, or MULTIPLY.
set_rgb_blending(blending_preset.ALPHA)set_vertices()
Sets all the vertices of the sprite grid with one argument: an array of tables with the x, y, u, and v fields for the positions and the texture coordinates.
local vertices = get_vertices()

-- Change the position and texture coordinate of the first vertex
vertices[1].x = 0
vertices[1].y = 0
vertices[1].u = 0
vertices[1].v = 0

set_vertices(vertices)
set_vertices_xy()
Sets all the vertices of the sprite grid with one argument: an array of tables with the x and y fields for the positions.
local vertices_xy = get_vertices_xy()

-- Change the position of the first vertex
vertices_xy[1].x = 0
vertices_xy[1].y = 0

set_vertices_xy(vertices_xy)
set_vertices_uv()
Sets all the vertices of the sprite grid with one argument: an array of tables with the u and v fields for the texture coordinates.
local vertices_uv = get_vertices_uv()

-- Change the texture coordinate of the first vertex
vertices_uv[1].u = 0
vertices_uv[1].v = 0

set_vertices_uv(vertices_uv)
set_vertices_x()
Sets all the vertices of the sprite grid with one argument: an array of x components of the positions.
local vertices_x = get_vertices_x()

-- Change the horizontal position of the first vertex
vertices_x[1] = 0

set_vertices_x(vertices_x)
set_vertices_y()
Sets all the vertices of the sprite grid with one argument: an array of y components of the positions.
local vertices_y = get_vertices_y()

-- Change the vertical position of the first vertex
vertices_y[1] = 0

set_vertices_y(vertices_y)
set_vertices_u()
Sets all the vertices of the sprite grid with one argument: an array of u components of the texture coordinates.
local vertices_u = get_vertices_u()

-- Change the horizontal texture coordinate of the first vertex
vertices_u[1] = 0

set_vertices_u(vertices_u)
set_vertices_v()
Sets all the vertices of the sprite grid with one argument: an array of v components of the texture coordinates.
local vertices_v = get_vertices_v()

-- Change the vertical texture coordinate of the first vertex
vertices_v[1] = 0

set_vertices_v(vertices_v)
Changelog
29 April 2024
-
[FIX] Fix a crash when saving a spritesheet with fractional canvas resize (#7)
06 December 2022
-
[NEW] Add support for multiple monitors and automatic window scaling
-
[NEW] Save video mode refresh rate and window position in the configuration
-
[FIX] Fix the interface layout of the file dialog with GUI scaling
27 September 2022 (r74 on Itch.io)
-
[NEW] Add support for dragging files from the system to the file dialog, Textures, Scripts, and Render windows
23 September 2022
-
[NEW] Add a list of pinned directories to the file dialog (part of the configuration)
-
[FIX] Close the file dialog modal popup before showing the quit confirmation one
-
[FIX] Show the quit confirmation modal window on Android
22 September 2022
-
[FIX] Fix a crash when playing animations in a sequential group with disabled looping
-
[FIX] Fix compilation with the latest version of the nCine
26 October 2021
-
[NEW] Move the texture rectangle of a sprite with the mouse while pressing the Alt key
-
[NEW] Resize the texture rectangle of a sprite with the mouse while pressing the Shift key
-
[FIX] Retain the texture rectangle of a sprite when changing texture
17 October 2021 (r66 on Itch.io)
-
[NEW] Add an option to specify the frames layout inside a spritesheet
-
[FIX] Clear the spritesheet texture before rendering frames
-
[FIX] Stabilize tips window size by extending tips strings with new lines
12 October 2021
-
[NEW] Add groups to organize sprites
-
[NEW] Add colors to sprites and groups to easily locate corresponding animations
-
[NEW] Assign a name to a newly created sprite, group, or animation
-
[FIX] Reverse list of sprites in combo boxes to match the rendering layer order
-
[FIX] Clone corresponding animations when cloning a sprite
-
[FIX] Unassign a sprite’s parent if the latter is deleted
07 October 2021
-
[NEW] Move sprites and animations with the up or down arrow key
-
[NEW] Navigate tips with the left or right arrow key
-
[FIX] Disable (without hiding) all the buttons from the textures, sprites, scripts and animations windows
-
[FIX] Disable (without hiding) the context menu items that cannot be selected
-
[FIX] Select the texture, sprite, script, or animation when opening its context menu
-
[FIX] In the animations window, replace the child index with a progressive number
-
[FIX] Show the texrect window even when there are no sprites
-
[FIX] Hide the root animation entry if the are no animations
-
[FIX] Show an horizontal separator even without a tree list below it
-
[FIX] Fix the selection after an animation drag and drop
14 September 2021
-
[NEW] Edit sprites and animations name in the Sprites and Animations windows
-
[NEW] Load a different file for a texture without affecting sprites or animations
-
[NEW] Change the texture associated to a sprite without affecting its animations
-
[NEW] When cloning a sprite also clone its children and its animations
-
[NEW] Flash the window and system taskbar when a render is finished on a desktop platform
-
[FIX] Fix the sprite, property, and script assignment when cloning an animation
-
[FIX] Fix the move direction of the move up and down buttons in the sprites window
-
[FIX] Disable (without hiding) the move up and down buttons in the sprites window when they cannot be used
-
[FIX] Disable (without hiding) the move up and down buttons in the animations window when they cannot be used
-
[FIX] Disable (without hiding) the next and previous buttons in the tips window when they cannot be used
16 July 2021
-
[NEW] Add a global speed multiplier for all animations
-
[FIX] Remove the
Savefile Sizeconfiguration entry as it is not needed anymore
01 June 2021 (r60 on Itch.io)
-
[NEW] Add an image preview tooltip for textures and sprites
-
[NEW] Add a
Quick LoadandQuick Savefunctionality -
[NEW] Add a confirmation modal window when trying to quit the program
-
[FIX] Change the keyboard shortcut for reloading a script
-
[FIX] Fix the file lists in the bundled textures and scripts combo boxes
30 May 2021
-
[NEW] Add direction and loop mode to parallel groups
-
[FIX] Fix sequential group playing when some contained animations are disabled
-
[FIX] Fix the override functionality of animation groups containing property animations
-
[FIX] Disable looping for animations inside a sequential group
-
[FIX] Set the correct parent of contained animations when cloning a group
-
[FIX] Reverse order in the sprites window to match rendering layer order
21 May 2021 (r58 on Itch.io)
-
[NEW] Set separate blending presets for RGB and alpha channels (also through scripting)
-
[NEW] Add a button to override the sprite used by every animation inside a group
-
[NEW] Add a "Select Parent" item in the contextual menu of sprites and animations
18 May 2021
-
[FIX] Fix UV coordinates of texture rectangles
-
[FIX] Replace backslashes with slashes in Windows file paths
-
[FIX] Change the code that updates the selected animation when removing one
-
[FIX] Update the selected sprite index when removing a texture
-
[FIX] Clamp texture coordinates wrapping to edges
-
[FIX] Snap anchor point position to the pixel
-
[FIX] Validate texture rectangle GUI values before applying them
16 May 2021
-
[NEW] Add delay, loop delay and initial time values
-
[FIX] Reverse the direction of animations when the parent sequential group is going backward
-
[FIX] Correct the detection of textures and scripts that are not relocatable
-
[FIX] Disable animation locking when the parent group is playing
10 May 2021
-
[NEW] Add context menus for textures, sprites, scritps, and animations
-
[FIX] Require pressing Alt to drag a sprite on the canvas to prevent accidental movements
09 May 2021
-
[NEW] Add a combo box to load bundled scripts
-
[FIX] Fix bundled projects loading when the configured textures path is not the default one
-
[FIX] Many fixes to the Emscripten and Android experimental versions
06 May 2021
-
[NEW] Add the tips window: by default, it will show up when the program starts
02 May 2021
-
[FIX] Reset the sprite grid when removing a grid or a script animation assigned to that sprite
25 April 2021
-
[NEW] Add support for Lua script animations
-
Add a new script type animation and a script resource
-
Add a new scripts window to the user interface
-
-
[FIX] Fix a crash when changing the texture rectangle of a sprite with a grid animation
06 April 2021
-
[NEW] Add a checkbox to enable or disable an animation
02 April 2021
-
[NEW] Add clone buttons for sprites and animations
-
[NEW] Add move up and down buttons in the animations windows
-
[FIX] Create a new animation under the selected one
-
[FIX] Select the dropped animation when drag’n’dropping
-
[FIX] Automatically select a newly created animation
01 April 2021
-
[NEW] Reactivate sequential animation groups
-
[NEW] Add direction and loop mode to sequential groups
-
[NEW] Add an option to lock or unlock the value of non-playing curve animations
-
[FIX] Fix animations order when deserializing animation groups
-
[FIX] Set the grid function when deserializing a grid animation
-
[FIX] Hide the grid function interface if there are no sprites to animate
30 March 2021
-
[NEW] Add support for drag and drop in the animations window
-
[NEW] Show the animation manager root group in the animations window
-
[FIX] Assign the selected sprite to newly created property and grid animations
28 February 2021
-
[NEW] Add support for drag and drop in the sprites window
-
[FIX] Put the move up and down sprite buttons on the same line as the add and remove ones
-
[FIX] Add support for the new fault-tolerant texture loader class of the nCine
-
[FIX] Avoid displaying the remove button if there are no textures or sprites
-
[FIX] Fix a crash when recursively removing an animation and its children
24 May 2020 (r33 on Itch.io)
Last paid version on Itch.io